Setting Up a Budget Home Video Studio

Creating high-quality video content from home is easier than ever, thanks to smartphones. You don’t need an expensive camera setup to create professional-looking videos—your phone, budget lighting, a decent microphone, and a few essential tools can do the trick.

Here’s a simple guide to set up your home video studio without overspending on high end production gear.

Primary Camera or Smartphone :

Your smartphone will be your primary recording tool, and luckily, most phones today have excellent cameras. Make sure you shoot in the highest resolution possible (1080p or 4K). Lock the exposure and focus to keep the camera from automatically adjusting while you record.

Stabilizing your phone is crucial for a smooth, professional look. Invest in a budget-friendly tripod or phone stand. If you don’t have one, you can improvise by stacking books or using any sturdy surface.

Watch this video by think media about using the smartphone as primary camera.

Light:

Lighting is essential to make your videos look sharp and professional. You don’t need expensive studio lights to get the job done. Inexpensive LED panel lights, ring lights, or even regular lamps with daylight-balanced bulbs can work wonders. The goal is to light up your subject well enough to avoid shadows or overexposure.

  • Key Light: This is your main light source. Position it 45 degrees to the side of your face or subject to add dimension.
  • Fill Light: A fill light softens the shadows created by the key light. Place it on the opposite side, but make sure it’s less intense.
  • Backlight (Optional): If you want to create a bit of separation between you and your background, add a backlight behind you. This adds a nice rim of light around your outline, giving a more professional and cinematic look.

Light Angles & Position :

The angle and position of your lights can drastically affect the mood of your video.

  • 45-Degree Key Light Angle: This is a classic lighting setup where the key light is placed at a 45-degree angle to your face. It creates a soft, natural shadow.
  • Fill Light Angle : Just opposite to the key light, use a fill light to cover all the shadow casted by key light and smoothen the frame.Check out this video by JoshWiniarski about setting up lights for a shot.

Camera Angles & Position :

Camera angles are just as important as lighting. For a natural perspective, keep your phone at eye level. If you’re looking for a more creative approach, experiment with slightly higher or lower angles, but be careful not to disrupt the angle too much.

Duration, Cuts, and Editing :

When shooting, it’s best to record in shorter segments rather than filming everything in one go. This makes editing easier and allows you to focus on one part of the script at a time. During editing, aim for short, engaging cuts to keep the audience’s attention.

As for the duration of your videos, shorter isoften better for beginners. A 5-10 minute video is usually long enough to cover key points without losing viewers’ attention. If your content is longer, consider breaking it into multiple parts. Check our recent video here for editing in Capcut or Premiere.

Final Touches :

After shooting your footage, review it carefully. You can use free or affordable video editing apps to trim unnecessary parts, add transitions, and fine-tune the lighting or sound. Don’t stress too much about perfection—what matters is consistency and the value of your content.

With a smartphone, budget lighting, and an affordable microphone, you can create professional-quality videos without needing to invest a lot of money. Experiment with different angles, lighting setups, and editing techniques to find what works best for you!

Using Digital Tools In Classroom

In today’s digital age, integrating technology into the classroom is essential for enhancing the learning experience. The right tools can engage students while making lessons more interactive and enjoyable. Below are four digital tools—Canva, Quizizz, CapCut, and iMovie, that can help elevate your teaching.

1. Canva: Creating Stunning Visuals for Lessons

Canva is an easy-to-use design tool that allows educators to create visually appealing presentations, infographics, posters, and worksheets. Its drag-and-drop interface makes it perfect for teachers and students alike. In the classroom, Canva can be used to create engaging presentations, visually summarize complex topics with infographics, or even allow students to design their own posters for projects. Canva offers customizable templates, making it easy to create professional designs quickly, even for those with no graphic design experience. Canva’s free version is packed with features, and its interface makes it suitable for both educators and students.

2. Quizizz: Making Quizzes Fun and Interactive

Quizizz is a gamified quiz platform that adds excitement to classroom learning. Educators can create quizzes or use existing ones from the extensive Quizizz library to engage students in real-time. This tool is excellent for formative assessments, providing instant feedback on student performance, making it easy to identify areas that need improvement. Quizizz can also be used for homework, with automatic grading saving teachers time, or for review games to prepare students for exams. The platform’s game-like design keeps students engaged, while the ability to access quizzes on various devices makes it ideal for online classes as well.

3. CapCut: Empowering Video Creation for Projects

CapCut is a powerful, yet user-friendly, video editing app that allows students and teachers to create polished video content or lectures. Educators can also use it to edit or create the recap of the lectures : both online & offline. Its ease of use and powerful editing features, combined with the fact that it’s free, make CapCut a great tool for video editing.

4. iMovie: Crafting Professional-Quality Classroom Content

iMovie is a well-known video editing software available for macOS and iOS, offering powerful tools to create professional-looking videos. Educators can use iMovie to craft lesson recaps, instructional videos, or explainer content for students. iMovie’s features, such as transitions, voiceovers, and green screen effects, allow for creative and dynamic video projects, making learning more engaging. The seamless integration with other Apple products makes iMovie an ideal tool for Apple-based classrooms, empowering both educators and students to produce professional-grade content.

Incorporating digital tools like Canva, Quizizz, CapCut, and iMovie into your classroom can enhance learning by fostering creativity, collaboration, and engagement. Whether you want to create visually appealing lessons, make quizzes fun, or give students the opportunity to develop multimedia skills, these tools provide the versatility needed to enrich the learning experience.

Contact OLC staff to reserve studio time or learn more about these digital tools’ integration. 

August Update

Image: Verizon employee Rene Ryan gives a tour of the Garden City Verizon plant to the Pace University project team.

Media Production in July

  • • 20 hours of consultations with faculty and staff in Dyson College, Haub, PESP, and the School of Education.

Project Updates:

  • – Production continues on an asynchronous course in telecommunications for Verizon Forward, a Pace partnership to prepare 6,000+ minority men and women to apply for jobs at Verizon.
  • – Please see these great posts on using teleprompters and Open Broadcasting Software (OBS) from Ankit, OLC Student Assistant.

Production Tip of the month: Kick-start your podcast in the OLC this summer by inviting your interview guests to join you in our studio.

Meet Ankit, Student Assistant

We are excited to introduce Ankit, the latest addition to the Pace Online Studios team.

Ankit joined us in June 2024 as a student assistant. He is currently pursuing a postgraduate degree in Mobile & Social Media Marketing at the Lubin School of Business. With a strong background in creative marketing and content production, Ankit brings a deep passion for media and production to our team.

At Pace Online Studios, Ankit will be assisting with both pre-production and post-production processes, including video editing and visual graphics.
Make sure to check out Ankit’s tutorial on the new app CAPCUT, a user-friendly tool for video editing and motion graphics!

Robinson Dedication – Program Video

Hello! Please follow these guidelines for submitting your Program video.

Please record your remarks using Zoom or your phone’s camera app. Please keep your remarks to 1-3 minutes.

If you are using Zoom, please use these settings:

  • Video > select “HD”
  • Background & Effects > Use the “blur” setting to blur the focus of your background.
  • Recording > use “Local Recording” so you can easily share your file via email or Google Drive (see email for details).

If you use your phone’s Camera App, please:

  • – Use a tripod (or tripod-like device) to stabilize your phone.
  • – Shoot in a landscape (horizontal) format.

Here are a few more items to consider before you record:

  • Lighting: If you have a ring light or desk lamp, use it in addition to other room lighting. Face toward a window, if you can, but definitely don’t turn your back to one!
  • Sound: Try your best to eliminate background noise.
  • Framing: To eliminate distortion, your camera should be at the same height as your nose. If you have a laptop, try resting it on a box.
  • Edits: No editing necessary! Don’t worry about an awkward start or finish: Pace staff will trim the beginning and end of your file. (We can remove awkward pauses as well.)

Five Tips for Presenting on Camera

Nervous about being in front of the camera? We got you covered!

Master the art of presenting on camera with these top 5 tips! Whether you’re a faculty member or staff, this video is a must-watch before stepping in front of the lens. Enhance your presentation skills, engage your audience, and leave a lasting impression. Don’t miss out on these invaluable insights!

Managing Effectively

Today I attended a Human Resources webinar on “Managing Effectively at Pace.” Although it doesn’t seem especially relevant to a blog about educational media, it’s really relevant to any collaborative activity – and developing educational content is always collaborative! To that end, I’ve highlighted some interesting points from the presentation below.

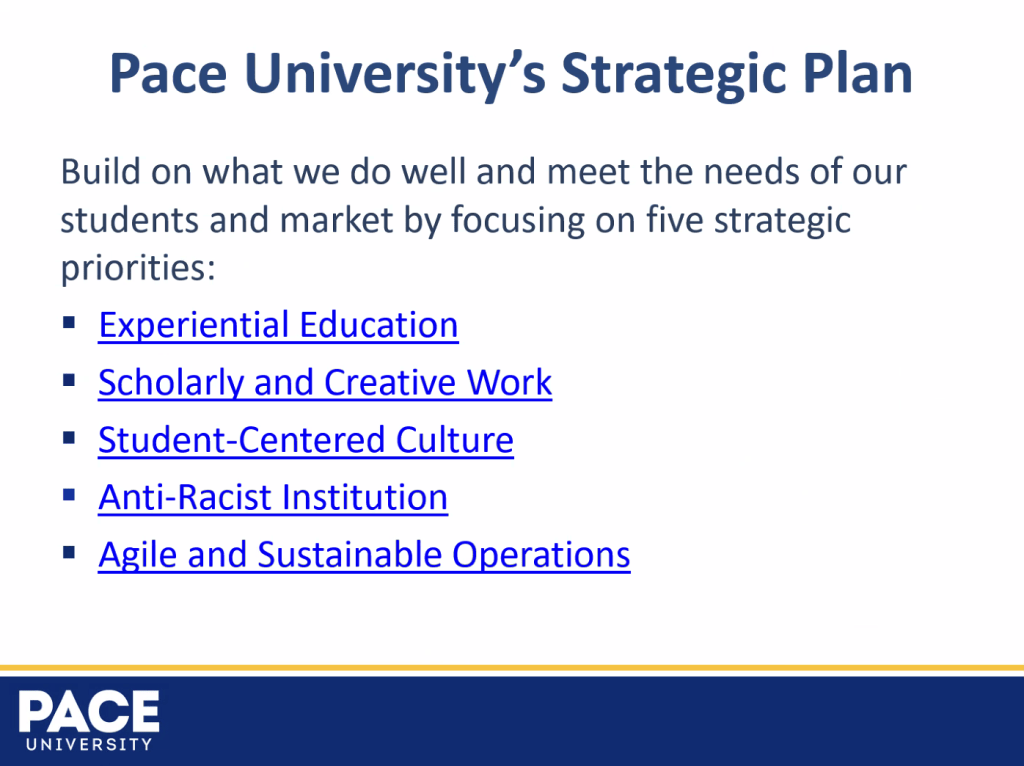
  • • Managers should be able to discuss, share, and promote Pace’s Strategic Plan
A slide describing main points of Pace’s Strategic Plan.
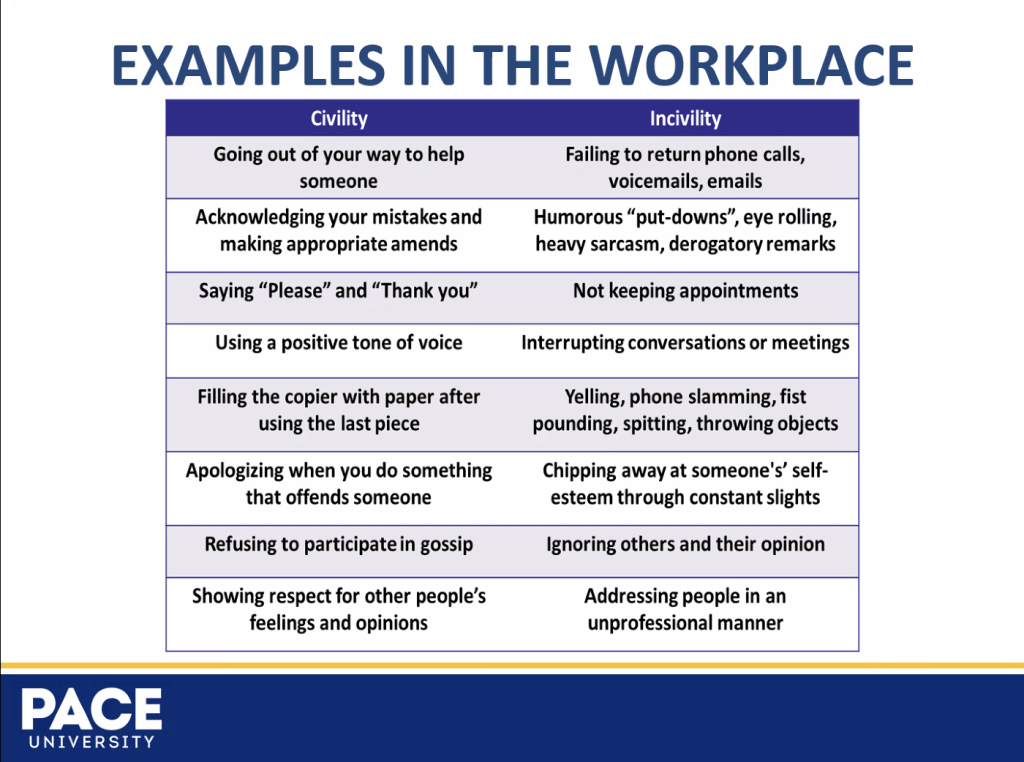
  • • All staff should uphold civility in the workplace, and managers should model civil behavior.
A slide with descriptive examples of “civility” and “incivility.”
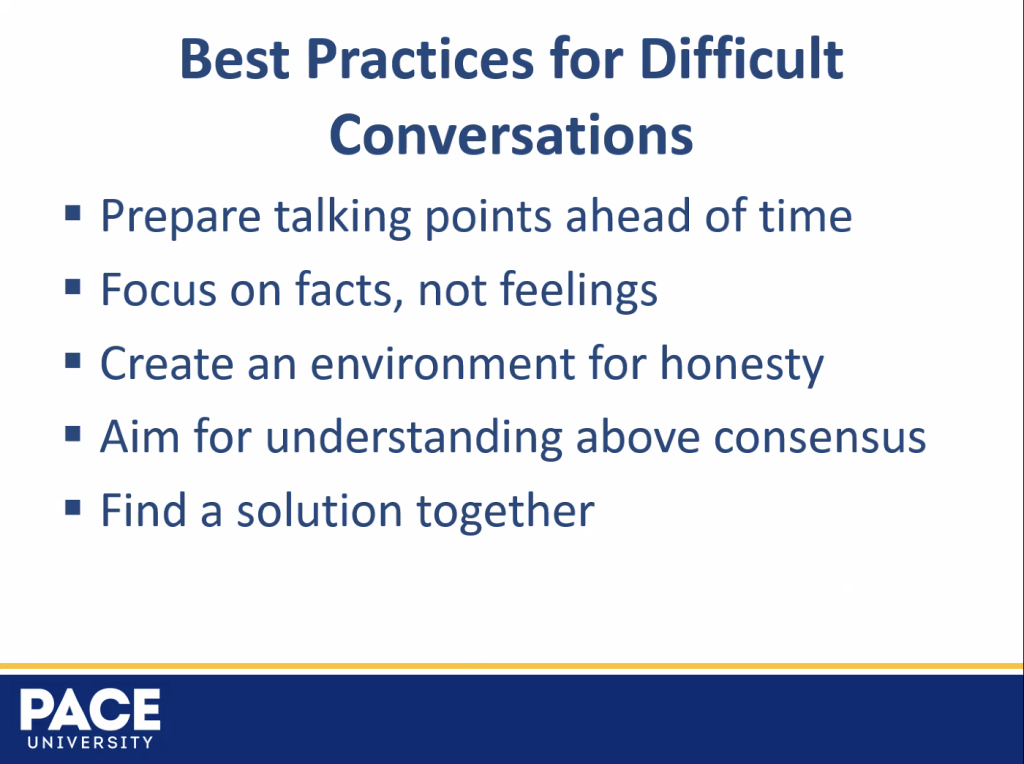
  • • Managers should be prepared for “difficult conversations” – conversations with staff members about behavior that needs to change.
A slide with some tips about preparing for and having productive conversations about behavioral change.

Of course these are only a few of the issues that were discussed in the webinar. There are many aspects of management that require knowledge, preparation, and skill. But each of these aspects of management has corollaries in creative collaborations, and I would summarize them as important aspects of Understanding, Action, and Communication.

Reflecting on each example above gives me ideas about how to collaborate effectively.

Thanks to the HR team (Sia Bundor, Luciana Ziegler, and others) who developed and delivered the session!

Skip to toolbar